How To Draw A Rose: A Step-by-Step Guide For Every Aspiring Artist
Do you want to learn how to draw a rose but don't know where to start? Well, you're in the right place! Drawing roses might seem intimidating at first, but with the right techniques and a little bit of patience, you can create stunning artworks that will impress anyone. Whether you're a beginner or looking to refine your skills, this guide will walk you through the process step-by-step.
Art has always been a form of expression, and roses have been symbols of love, beauty, and passion for centuries. Learning how to draw a rose not only enhances your artistic abilities but also allows you to capture the essence of this iconic flower. So, grab your pencil, paper, and let's dive into the world of rose drawing!
In this article, we'll cover everything from basic shapes to advanced shading techniques. You'll learn how to create realistic petals, add depth, and make your rose look lifelike. Don't worry if you're not a professional artist yet; the key is practice, and we'll make sure you have all the tools you need to succeed. Let's get started!
Read also:Jared S Gilmore The Rising Star Of Hollywoodrsquos Young Talent
Why Learn How to Draw a Rose?
Roses are not just beautiful flowers; they carry deep meanings and emotions. By learning how to draw a rose, you're not only improving your artistic skills but also connecting with a timeless symbol of love and beauty. Roses have been featured in countless artworks throughout history, from classical paintings to modern illustrations. Mastering this skill will give you the confidence to tackle more complex projects in the future.
Additionally, drawing roses can be incredibly therapeutic. It allows you to focus on the intricate details and patterns of nature, providing a sense of calm and fulfillment. Whether you're drawing for fun or aiming to create professional artwork, the process of learning how to draw a rose is both rewarding and enjoyable.
Basic Materials You Need to Get Started
Before we dive into the actual drawing process, let's talk about the materials you'll need. You don't have to break the bank to get started. Here's a quick list of essentials:
- Pencils (HB, 2B, 4B, and 6B)
- Sketchbook or drawing paper
- Eraser (kneaded and regular)
- Blending stumps or tortillons
- Reference images (optional)
These basic tools will help you create a wide range of textures and tones, which are essential for drawing realistic roses. As you progress, you can experiment with colored pencils, charcoal, or digital tools if you prefer.
Understanding the Anatomy of a Rose
To draw a rose convincingly, it's important to understand its structure. A rose is made up of several key components, including the petals, sepals, stem, and leaves. Each part plays a role in creating the overall shape and appearance of the flower.
Read also:Lebron James Sunshine The Kings Journey Under The Bright Lights
Petals: The Heart of the Rose
Petals are the most prominent feature of a rose. They come in various shapes and sizes, depending on the type of rose. The outer petals are usually larger and more open, while the inner petals are smaller and more tightly curled. Pay attention to the curves and folds of the petals, as they add depth and dimension to your drawing.
Stem and Leaves: Adding Balance
The stem and leaves provide balance and context to your rose drawing. The stem should be smooth and slightly curved, while the leaves have a distinct serrated edge. Don't forget to include the thorns, which add character and realism to your artwork.
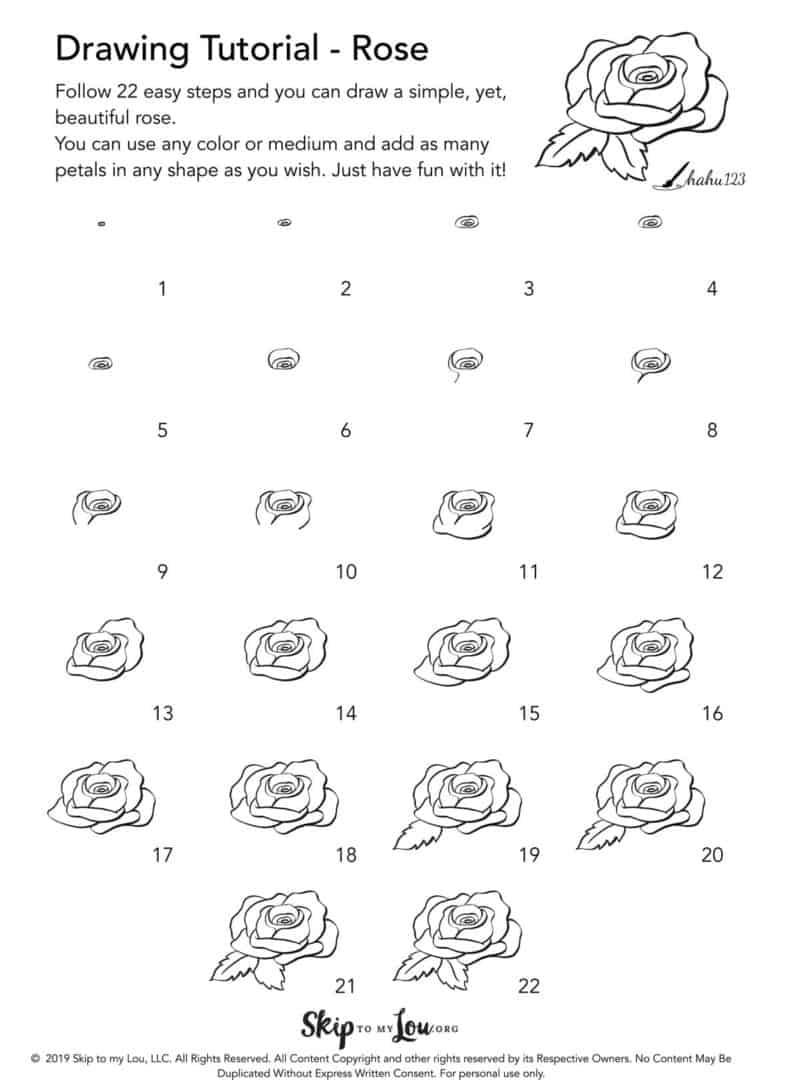
Step-by-Step Guide: How to Draw a Rose
Now that you have a basic understanding of the rose's anatomy, let's move on to the drawing process. Follow these steps to create a beautiful rose from scratch.
Step 1: Sketch the Basic Shapes
Start by drawing a small circle for the center of the rose. Then, add a larger oval around it to represent the outer petals. These basic shapes will serve as a foundation for your drawing. Keep your lines light and loose at this stage.
Step 2: Add the Petals
Begin adding petals around the center circle. Start with the inner petals, which are smaller and more tightly curled. Gradually work your way outward, adding larger petals as you go. Remember to vary the size and shape of the petals to create a natural look.
Step 3: Define the Stem and Leaves
Once you're satisfied with the petals, move on to the stem and leaves. Draw a long, curved line for the stem, and add a few leaves on either side. Include the thorns by drawing small triangles along the stem. This will give your rose a more realistic appearance.
Step 4: Refine the Details
Now it's time to refine the details of your rose. Go over your initial sketch and darken the lines where necessary. Pay attention to the curves and folds of the petals, as well as the texture of the stem and leaves. This step is crucial for creating a lifelike drawing.
Step 5: Add Shading and Texture
To make your rose pop off the page, add shading and texture using your pencils. Start with light strokes and gradually build up the darkness. Focus on the areas where shadows naturally occur, such as the folds of the petals and the underside of the leaves. Use blending stumps to smooth out the transitions between light and dark areas.
Tips for Drawing Realistic Roses
Here are a few tips to help you take your rose drawings to the next level:
- Study real roses or reference images to understand their structure and proportions.
- Practice drawing different types of roses to improve your skills.
- Experiment with various shading techniques, such as cross-hatching and stippling.
- Don't be afraid to make mistakes; they're part of the learning process.
Remember, the key to drawing realistic roses is observation and practice. The more you draw, the better you'll become.
Common Mistakes to Avoid
Even the most experienced artists make mistakes, but being aware of them can help you improve faster. Here are some common pitfalls to watch out for:
Mistake 1: Overcomplicating the Petals
Rose petals may look intricate, but they don't need to be overly detailed. Focus on capturing the overall shape and flow of the petals rather than trying to replicate every tiny detail.
Mistake 2: Ignoring Proportions
Proportions are crucial when drawing a rose. Make sure the size of the petals, stem, and leaves are in harmony with each other. A rose with mismatched proportions will look unnatural.
Mistake 3: Forgetting the Background
The background can greatly enhance your rose drawing. Consider adding a simple background or incorporating the rose into a larger composition. This will give your artwork more context and depth.
Advanced Techniques for Mastering Rose Drawing
Once you've mastered the basics, it's time to explore advanced techniques that will elevate your rose drawings. Here are a few ideas to try:
Technique 1: Layering Colors
If you're using colored pencils, try layering different colors to create rich, vibrant petals. Start with a light base color and gradually add darker shades to create depth and dimension.
Technique 2: Creating Depth with Shadows
Shadows are essential for creating a three-dimensional effect. Pay attention to the light source and use shading to emphasize the curves and folds of the petals. This will make your rose look more realistic.
Technique 3: Experimenting with Different Mediums
Don't limit yourself to pencils; try experimenting with other mediums such as charcoal, pastels, or digital tools. Each medium offers unique possibilities and can help you develop your personal style.
Conclusion: Keep Practicing and Have Fun
Learning how to draw a rose is a journey that requires patience, practice, and a willingness to learn. By following the steps and tips outlined in this guide, you'll be well on your way to creating beautiful rose drawings that capture the essence of this iconic flower.
Remember, the most important thing is to have fun and enjoy the process. Art is a form of self-expression, and every drawing you create is a reflection of your unique perspective. So, keep practicing, stay inspired, and don't forget to share your artwork with the world!
Call to Action: We'd love to see your rose drawings! Share your artwork in the comments below or tag us on social media. And if you found this guide helpful, don't forget to check out our other articles on drawing and art techniques. Happy drawing!
Table of Contents
- Why Learn How to Draw a Rose?
- Basic Materials You Need to Get Started
- Understanding the Anatomy of a Rose
- Step-by-Step Guide: How to Draw a Rose
- Tips for Drawing Realistic Roses
- Common Mistakes to Avoid
- Advanced Techniques for Mastering Rose Drawing
- Conclusion: Keep Practicing and Have Fun


