IoT SSH From Anywhere On Ubuntu Server: The Ultimate Guide
Listen up, tech enthusiasts! If you're into IoT and want to manage your Ubuntu server remotely from anywhere, this article is your golden ticket. Whether you're a hobbyist, developer, or small business owner, being able to SSH into your server securely is a must-have skill. Let’s dive in and make your life easier with some serious tech wizardry.
Imagine this—you're chilling at a café, sipping your favorite coffee, and suddenly you realize you need to tweak something on your IoT setup back home. No worries, my friend! With SSH access, you can connect to your Ubuntu server from anywhere in the world. It's like having a remote control for your server, only way cooler.
But hold up—there's more to it than just typing in a command. You need to set things up right, ensure security, and avoid common pitfalls. That's where we come in. This guide will walk you through every step, from configuring your server to troubleshooting common issues. By the end of this, you'll be a pro at IoT SSH management.
Read also:How To Download Hdhub4u Movies Your Ultimate Guide
Why IoT SSH on Ubuntu Server Matters
Let’s talk about why SSH is such a big deal in the IoT world. IoT devices are everywhere these days, and they often rely on servers to store data, run applications, and manage tasks. If you're running an Ubuntu server as part of your IoT setup, having secure remote access is crucial.
SSH (Secure Shell) is a protocol that lets you securely connect to your server over the internet. It encrypts your communication, so no one can snoop on your commands or data. Plus, it’s super easy to use once you get the hang of it. Whether you're managing smart home devices, monitoring sensors, or running a web application, SSH gives you the power to control everything remotely.
Benefits of Using SSH for IoT
- Secure connection that protects your data
- Easy to set up with basic Linux knowledge
- Works from anywhere with an internet connection
- Supports automation and scripting for repetitive tasks
- Compatible with a wide range of IoT devices
Now that you know why SSH is important, let’s move on to the good stuff—how to set it up.
Setting Up SSH on Your Ubuntu Server
Alright, let’s get our hands dirty. The first step is setting up SSH on your Ubuntu server. Don’t worry—it’s not as complicated as it sounds. Just follow these steps, and you’ll be good to go.
Step 1: Install OpenSSH
OpenSSH is the most popular SSH server software for Linux. If it’s not already installed on your Ubuntu server, you can install it with a simple command:
sudo apt update && sudo apt install openssh-server
Read also:Hdhub 4utv Your Ultimate Guide To Streaming Movies And Series
Once it’s installed, you can check if the SSH service is running by typing:
sudo systemctl status ssh
If everything’s working fine, you should see a message saying the service is active. Easy peasy, right?
Step 2: Configure SSH Settings
Now, let’s tweak the SSH settings to make things more secure. Open the SSH config file with your favorite text editor:
sudo nano /etc/ssh/sshd_config
Here are a few changes you can make:
- Change the default port (usually 22) to something less obvious
- Disable root login to prevent unauthorized access
- Enable key-based authentication for added security
Remember to restart the SSH service after making changes:
sudo systemctl restart ssh
Securing Your IoT SSH Connection
Security is key when it comes to IoT SSH. You don’t want some random hacker gaining access to your server, do you? Here are a few tips to keep your connection safe:
Use Strong Passwords
Weak passwords are a hacker’s dream. Make sure your SSH password is strong and unique. A mix of uppercase, lowercase, numbers, and symbols is ideal. And don’t use the same password for multiple accounts—duh!
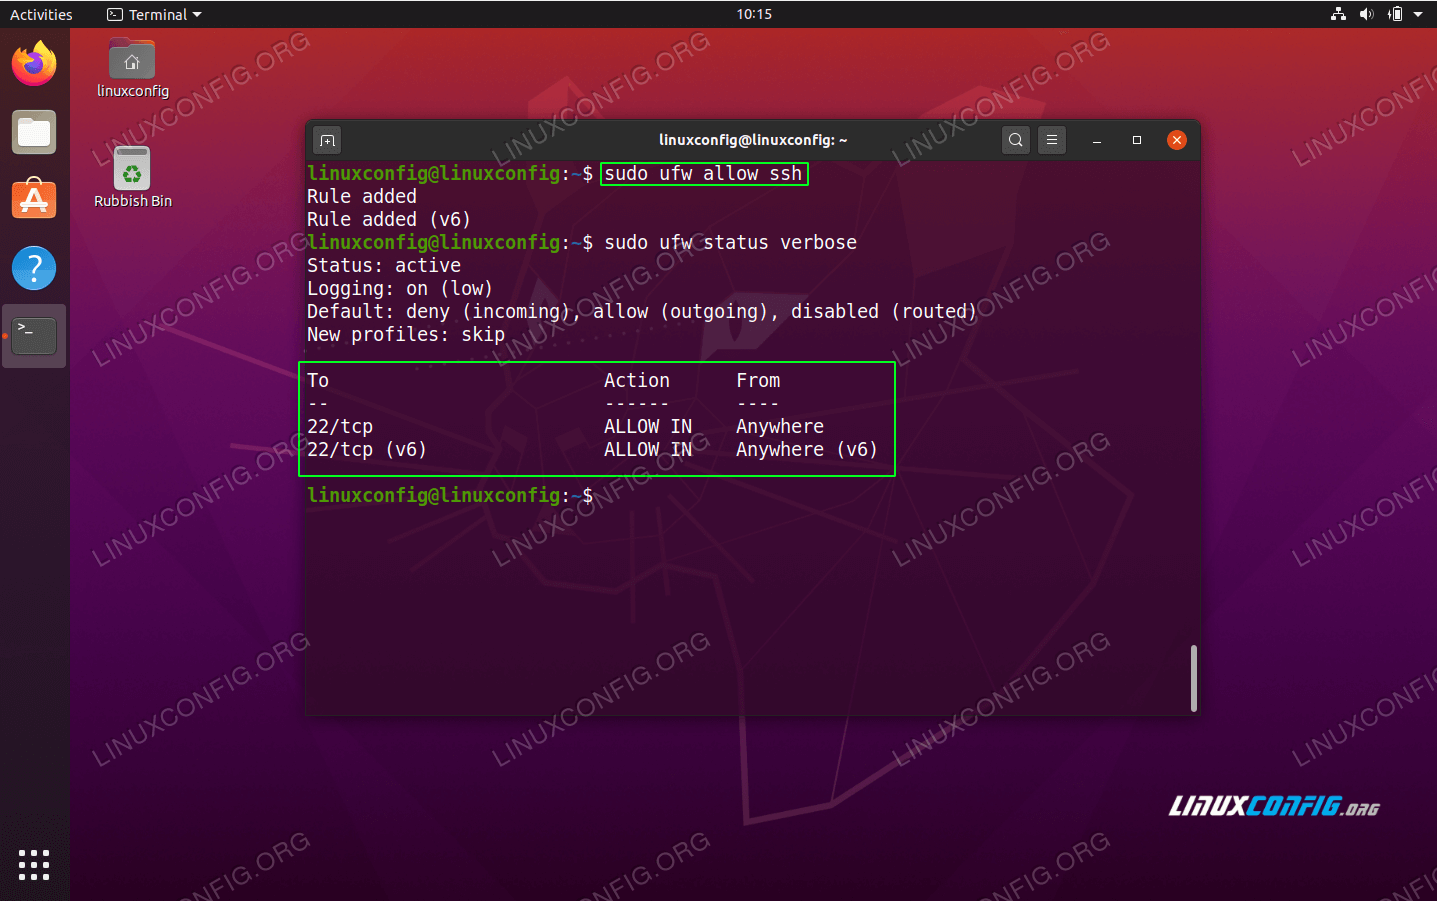
Enable Firewall Rules
A firewall can block unwanted traffic and protect your server from attacks. Ubuntu comes with a built-in firewall called UFW (Uncomplicated Firewall). You can enable it with these commands:
sudo ufw allow ssh
sudo ufw enable
This will allow SSH traffic while blocking everything else. Pretty neat, huh?
Monitor for Suspicious Activity
Keep an eye on your server logs to spot any suspicious activity. You can check the SSH logs with this command:
sudo tail -f /var/log/auth.log
If you notice failed login attempts or other weird stuff, investigate immediately. Better safe than sorry!
Connecting to Your Server from Anywhere
Now that your server is set up and secure, it’s time to connect to it from anywhere. Here’s how you can do it:
Method 1: Using a Static IP Address
If your server has a static IP address, you can connect to it directly using the SSH command:
ssh username@your_server_ip
Just replace "username" with your actual username and "your_server_ip" with your server’s IP address. Simple as that!
Method 2: Using a Dynamic DNS Service
What if your server doesn’t have a static IP? No problem! You can use a dynamic DNS service to assign a domain name to your server. This way, you can connect using a domain name instead of an IP address.
Popular dynamic DNS services include No-IP and DuckDNS. They’re easy to set up and totally worth it.
Troubleshooting Common SSH Issues
Even the best-laid plans can go awry sometimes. If you’re having trouble connecting to your server, here are a few things to check:
Check Your Internet Connection
Make sure both your server and client devices are connected to the internet. Sounds obvious, but it’s worth mentioning.
Verify SSH Service Status
Double-check that the SSH service is running on your server. Use the command we mentioned earlier:
sudo systemctl status ssh
Inspect Firewall Rules
If your firewall is blocking SSH traffic, you won’t be able to connect. Ensure that SSH is allowed in your firewall settings.
Advanced SSH Features for IoT
Once you’ve mastered the basics, you can explore some advanced SSH features to take your IoT setup to the next level:
Tunneling
SSH tunneling lets you securely forward traffic between your local machine and server. It’s great for accessing services that aren’t exposed to the internet.
Port Forwarding
Port forwarding allows you to map a port on your server to a port on your local machine. This is useful for running web applications or other services.
SSH Keys
Instead of using passwords, you can use SSH keys for authentication. They’re more secure and convenient, especially if you connect frequently.
Best Practices for IoT SSH Management
Here are a few best practices to keep in mind when managing SSH for IoT:
Regularly Update Your Server
Keep your Ubuntu server and all installed packages up to date. This ensures you have the latest security patches and features.
Limit User Access
Don’t give everyone SSH access to your server. Limit it to trusted users only, and use role-based access control if possible.
Document Your Setup
Keep detailed notes on how you set up SSH, including any custom configurations or scripts. This will save you time if you need to troubleshoot later.
Conclusion
There you have it—everything you need to know about IoT SSH on Ubuntu server. From setting up SSH to securing your connection and troubleshooting issues, we’ve covered it all. Remember, the key to successful IoT management is staying organized, keeping things secure, and continuously learning.
So, what are you waiting for? Go ahead and try it out! And don’t forget to share your experience in the comments below. If you found this article helpful, spread the love by sharing it with your fellow tech enthusiasts. Happy tinkering!
Table of Contents
- IoT SSH From Anywhere on Ubuntu Server: The Ultimate Guide
- Why IoT SSH on Ubuntu Server Matters
- Benefits of Using SSH for IoT
- Setting Up SSH on Your Ubuntu Server
- Step 1: Install OpenSSH
- Step 2: Configure SSH Settings
- Securing Your IoT SSH Connection
- Use Strong Passwords
- Enable Firewall Rules
- Monitor for Suspicious Activity
- Connecting to Your Server from Anywhere
- Method 1: Using a Static IP Address
- Method 2: Using a Dynamic DNS Service
- Troubleshooting Common SSH Issues
- Check Your Internet Connection
- Verify SSH Service Status
- Inspect Firewall Rules
- Advanced SSH Features for IoT
- Tunneling
- Port Forwarding
- SSH Keys
- Best Practices for IoT SSH Management
- Regularly Update Your Server
- Limit User Access
- Document Your Setup


