Unlocking The Best SSH To IoT Device AWS Solutions
Are you ready to dive into the world of IoT and AWS? Best SSH to IoT Device AWS is more than just a tech buzzword. It’s your gateway to seamless device connectivity, enhanced security, and top-tier performance. Whether you’re a developer, an IT admin, or just someone who wants to explore the possibilities of IoT and AWS, this article will be your ultimate guide.
Talk about IoT and AWS, and you’re entering a realm where technology meets innovation. But here’s the deal—getting the best SSH to IoT Device AWS setup isn’t as straightforward as it seems. You’ve got to navigate through a maze of protocols, security measures, and configurations. That’s why we’ve crafted this guide—to simplify the process for you.
Before we get into the nitty-gritty, let’s set the stage. SSH (Secure Shell) is your secure access pass to IoT devices hosted on AWS. It’s like having a VIP key to your tech kingdom. But how do you make sure you’re using the best SSH to IoT Device AWS practices? Stick around, and we’ll break it all down for you.
Read also:Jameliz Leaks The Untold Story Behind The Viral Sensation
Understanding the Basics of SSH in IoT
First things first, let’s talk about what SSH actually is. SSH stands for Secure Shell, and it’s like the Swiss Army knife of remote access tools. It allows you to securely connect to your IoT devices hosted on AWS without worrying about pesky hackers or data breaches. And guess what? It’s super easy to set up if you know what you’re doing.
Here’s the lowdown: SSH encrypts all your data, making it unreadable to anyone who might intercept it. This is a big deal when you’re dealing with sensitive IoT data. But hey, don’t just take our word for it. According to a study by Cisco, secure communication protocols like SSH are essential for protecting IoT ecosystems.
So, why is SSH so crucial for IoT devices on AWS? Well, think about it. AWS offers a scalable and reliable platform for hosting IoT devices, but without a secure connection method, all that scalability is for nothing. That’s where SSH comes in, locking everything down tight.
How SSH Works with IoT Devices
Now that you know what SSH is, let’s talk about how it works with IoT devices. When you connect to an IoT device using SSH, you’re essentially creating a secure tunnel between your computer and the device. This tunnel ensures that all communication is encrypted and secure.
- SSH uses public and private keys for authentication, which means no one can access your device without the right key.
- It supports various encryption algorithms, giving you flexibility in how you secure your data.
- With SSH, you can run commands on your IoT device remotely, making it super convenient for managing and troubleshooting.
But here’s the kicker—setting up SSH properly is key. If you don’t configure it correctly, you could leave your IoT devices vulnerable to attacks. So, pay attention to those config files and make sure everything is locked down tight.
Why AWS is the Best Platform for IoT Devices
Now that we’ve covered SSH, let’s talk about why AWS is the best platform for hosting IoT devices. AWS offers a robust set of services specifically designed for IoT, making it a top choice for developers and businesses alike.
Read also:Hdhub4u Movies Hollywood Your Ultimate Destination For Blockbuster Entertainment
AWS IoT Core, for example, provides a managed cloud service that lets connected devices easily and securely interact with cloud applications and other devices. It’s like having a personal assistant for your IoT devices, handling all the heavy lifting for you.
But wait, there’s more. AWS also offers tools for device management, data analytics, and machine learning, all of which can enhance your IoT setup. And let’s not forget about scalability. With AWS, you can start small and scale up as your needs grow, ensuring you’re always using the best SSH to IoT Device AWS practices.
Key Features of AWS IoT Services
Here’s a quick rundown of some key features of AWS IoT services that make it the best platform for IoT devices:
- AWS IoT Core for secure and scalable device communication.
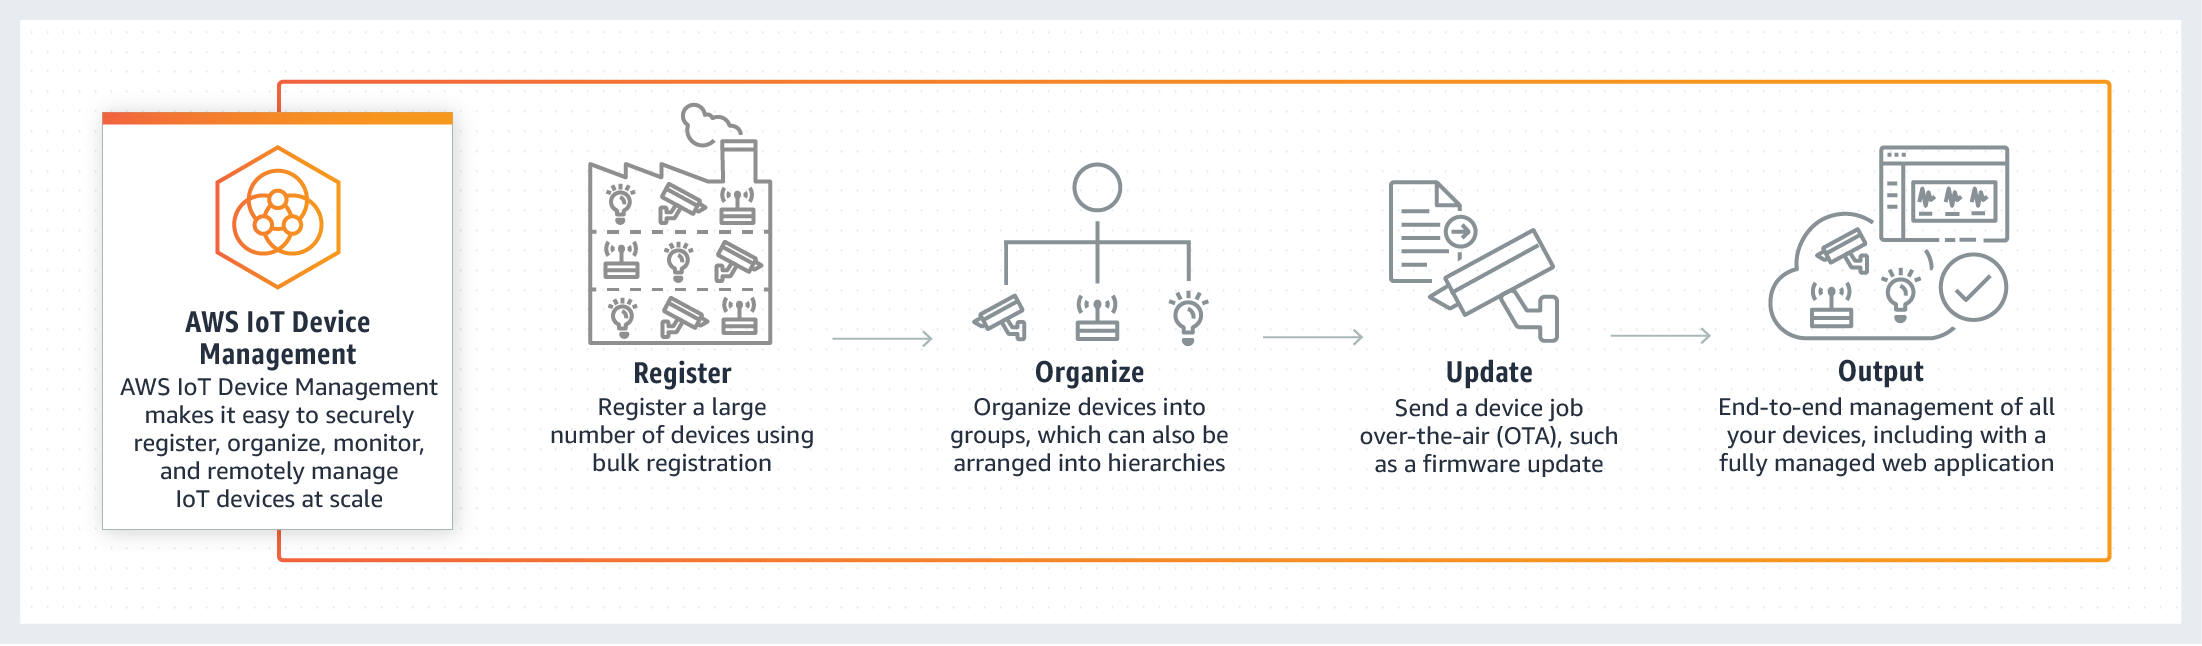
- AWS IoT Device Management for easy device onboarding and monitoring.
- AWS IoT Analytics for gaining insights from your IoT data.
- AWS IoT Greengrass for running local compute and messaging.
These features work together to create a powerful ecosystem for IoT devices. And when you pair them with SSH, you’ve got a setup that’s both secure and efficient.
Best Practices for SSH to IoT Device AWS
Now that you know why SSH and AWS are great for IoT devices, let’s talk about the best practices for setting them up. Following these practices will ensure your setup is both secure and efficient.
First up, always use key-based authentication instead of passwords. It’s more secure and less prone to brute-force attacks. And don’t forget to disable password authentication altogether once you’ve set up your keys.
Next, make sure you’re using the latest version of SSH. Older versions might have vulnerabilities that could be exploited by hackers. Regularly updating your SSH client and server is a must.
Securing Your IoT Devices with SSH
Securing your IoT devices with SSH goes beyond just setting up keys and updating software. Here are a few more tips to keep your devices safe:
- Limit access to your SSH server by using IP whitelisting.
- Use a non-standard port for SSH to make it harder for attackers to find.
- Implement two-factor authentication for an extra layer of security.
By following these best practices, you’ll be well on your way to having the best SSH to IoT Device AWS setup possible.
Setting Up SSH on AWS IoT Devices
Alright, let’s get down to business. How do you actually set up SSH on your AWS IoT devices? The process might seem a bit daunting at first, but with a little guidance, you’ll be up and running in no time.
Step one is to create an EC2 instance on AWS. This will serve as your SSH server. Once your instance is up and running, you’ll need to configure the security group to allow SSH access. This is where you can set up IP whitelisting and non-standard ports.
Next, generate your SSH keys. You can use tools like PuTTYgen or ssh-keygen to create your keys. Once you’ve got your keys, copy the public key to your EC2 instance and configure your SSH server to use key-based authentication.
Troubleshooting Common SSH Issues
Even with the best setup, you might run into issues with SSH. Here are a few common problems and how to fix them:
- Connection refused: Check your security group settings and make sure SSH is allowed.
- Permission denied: Make sure your keys are set up correctly and that password authentication is disabled.
- Timeout errors: Check your network settings and ensure there’s no firewall blocking SSH traffic.
By troubleshooting these common issues, you’ll be able to keep your SSH connection running smoothly.
Exploring Advanced SSH Techniques
Once you’ve got the basics down, it’s time to explore some advanced SSH techniques. These techniques can help you optimize your SSH setup and make it even more secure.
One technique is to use SSH tunneling. This allows you to securely access services on your IoT device that aren’t normally accessible over the internet. For example, you could use SSH tunneling to access a database running on your device.
Another technique is to use SSH agent forwarding. This allows you to use your local SSH keys to authenticate with other servers from your IoT device, without having to copy your keys around.
SSH Tips and Tricks for IoT Devices
Here are a few more tips and tricks to help you get the most out of SSH on your IoT devices:
- Use SSH config files to simplify your connections.
- Set up SSH aliases for quick access to frequently used devices.
- Monitor your SSH logs for any suspicious activity.
By using these advanced techniques and tips, you’ll be able to take your SSH to IoT Device AWS setup to the next level.
Data Security in SSH to IoT Device AWS
Data security is a big deal when it comes to SSH and IoT devices. With so much sensitive information being transmitted, it’s crucial to have robust security measures in place.
SSH provides encryption for your data, but that’s not the only thing you need to consider. You also need to think about data at rest and how you’re storing it on your IoT devices. AWS offers services like S3 and DynamoDB that can help you securely store your data.
Additionally, consider implementing data encryption on your devices themselves. This adds another layer of security and ensures that even if someone gains physical access to your device, they won’t be able to read your data.
Best Security Tools for IoT Devices
Here are some of the best security tools you can use to enhance the security of your IoT devices:
- AWS CloudTrail for monitoring API activity.
- AWS Config for auditing your AWS resources.
- AWS Shield for protecting against DDoS attacks.
By using these tools, you’ll be able to create a comprehensive security strategy for your IoT devices.
Scaling Your SSH to IoT Device AWS Setup
As your IoT setup grows, you’ll need to think about scalability. The best SSH to IoT Device AWS setup should be able to handle increased traffic and more devices without breaking a sweat.
AWS offers several services that can help you scale your setup. For example, you can use Auto Scaling to automatically adjust the number of EC2 instances based on demand. You can also use Elastic Load Balancing to distribute traffic across multiple instances.
When scaling your setup, make sure to monitor your resources closely. AWS CloudWatch can help you keep an eye on your metrics and alert you to any potential issues.
Optimizing Your SSH Configuration for Scalability
Here are a few tips for optimizing your SSH configuration for scalability:
- Use SSH key rotation to ensure your keys are always up to date.
- Set up SSH bastion hosts to centralize access to your devices.
- Implement SSH connection limits to prevent overloading your devices.
By optimizing your SSH configuration, you’ll be able to scale your setup efficiently and effectively.
Conclusion: Taking Your SSH to IoT Device AWS Setup to the Next Level
And there you have it—the ultimate guide to the best SSH to IoT Device AWS setup. We’ve covered everything from the basics of SSH to advanced techniques and scalability strategies. By following the tips and best practices outlined in this article, you’ll be able to create a secure and efficient setup that meets all your IoT needs.
So, what are you waiting for? Dive in and start exploring the possibilities of SSH and AWS for your IoT devices. And don’t forget to leave a comment or share this article with your tech-savvy friends. Together, let’s unlock the full potential of IoT and AWS!
Table of Contents:
- Understanding the Basics of SSH in IoT
- Why AWS is the Best Platform for IoT Devices
- Best Practices for SSH to IoT Device AWS
- Setting Up SSH on AWS IoT Devices
- Exploring Advanced SSH Techniques
- Data Security in SSH to IoT Device AWS
- Scaling Your SSH to IoT Device AWS Setup


